 Pin It
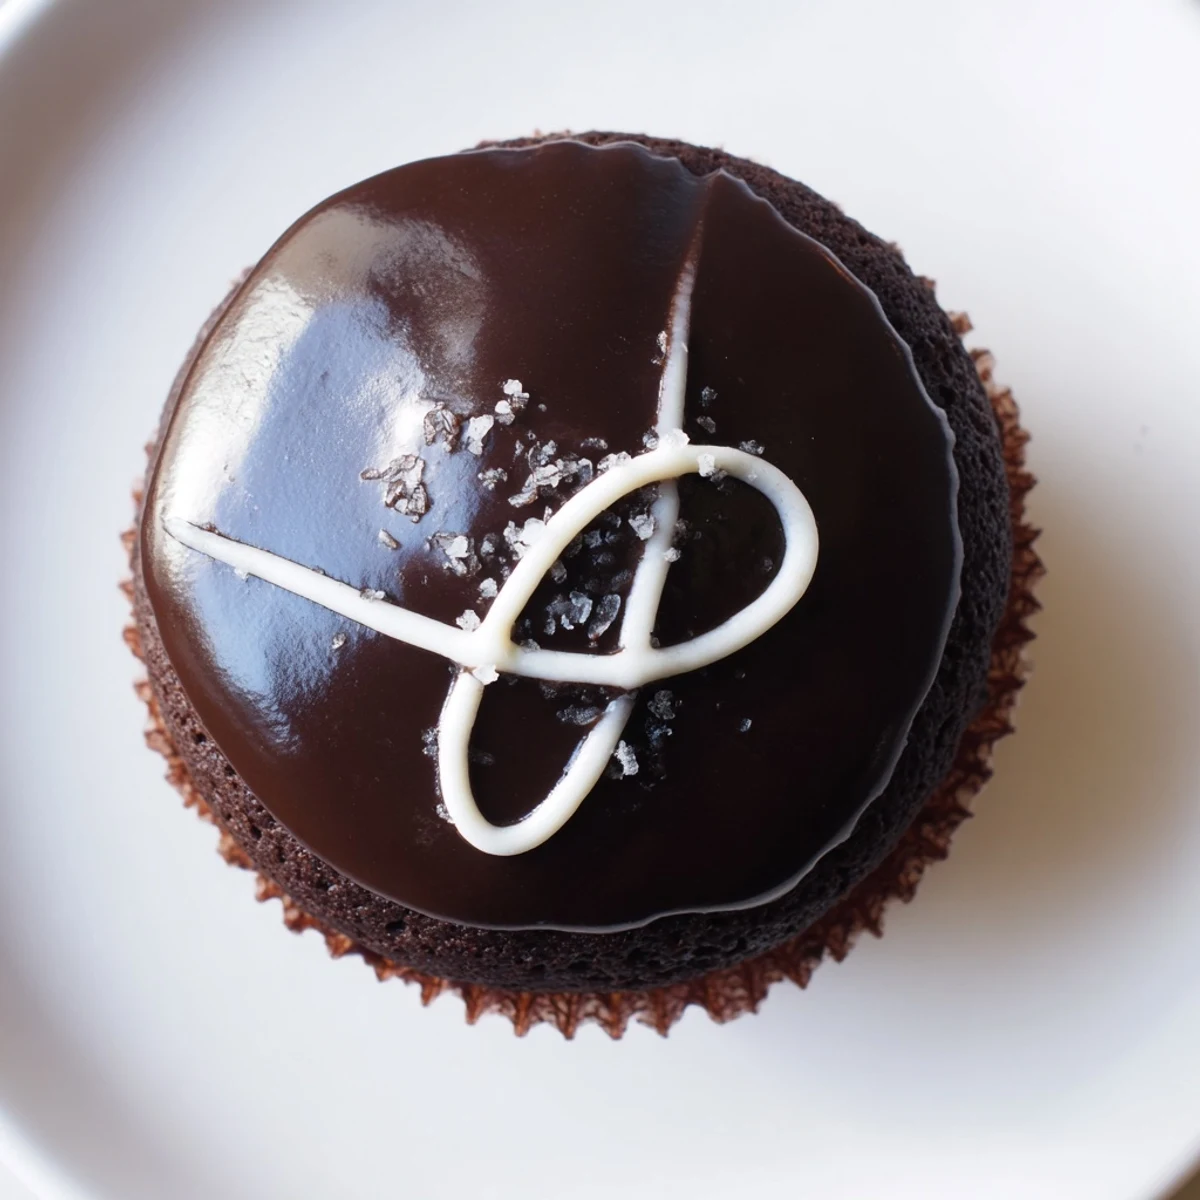
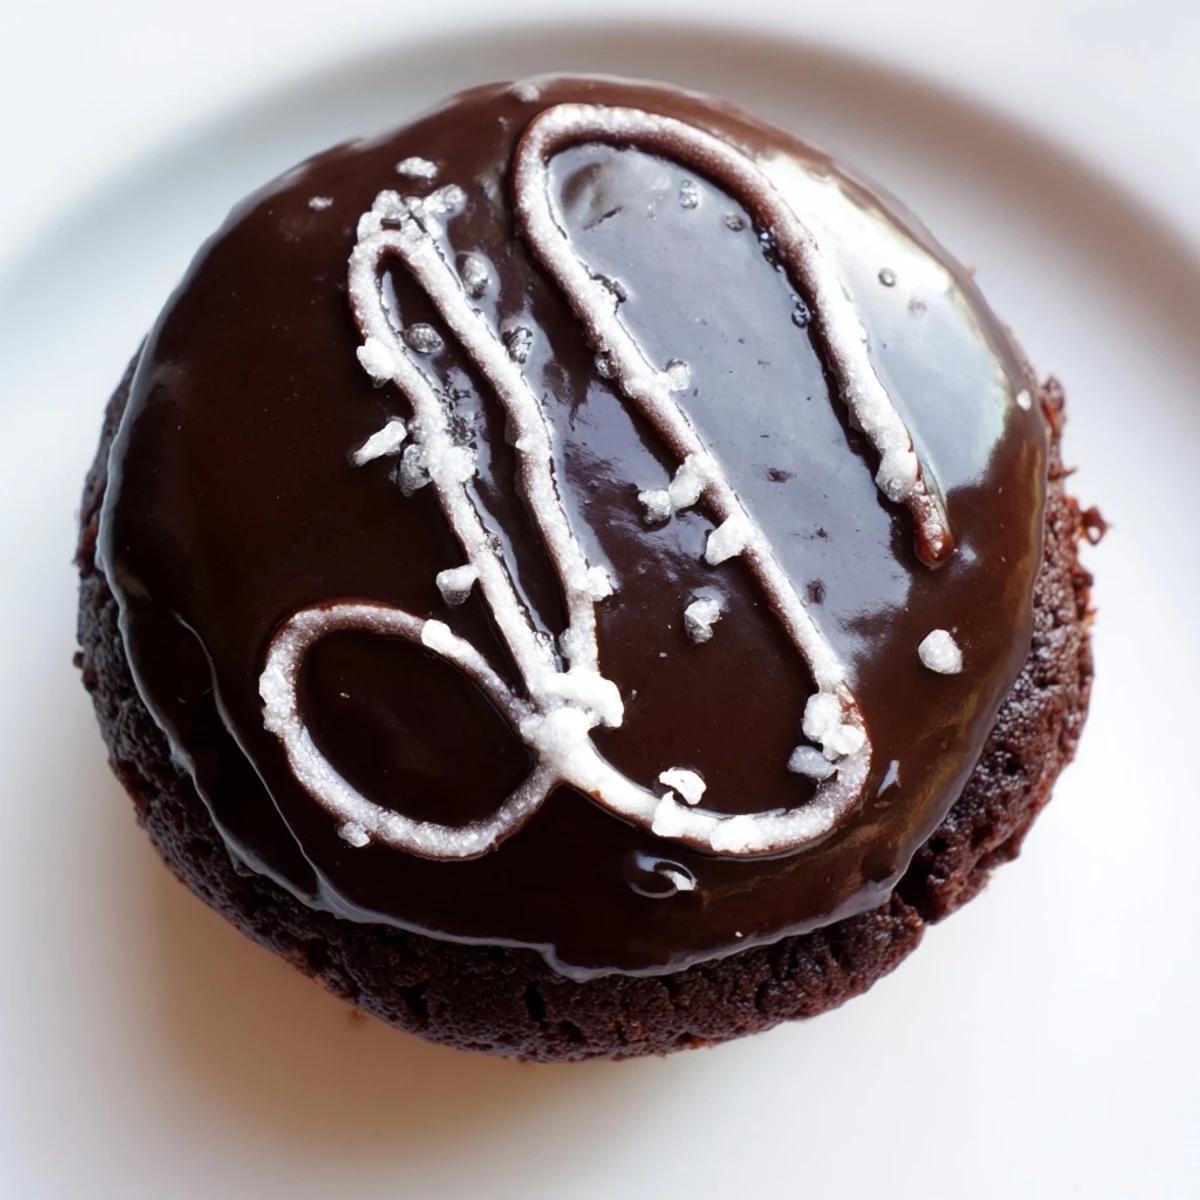
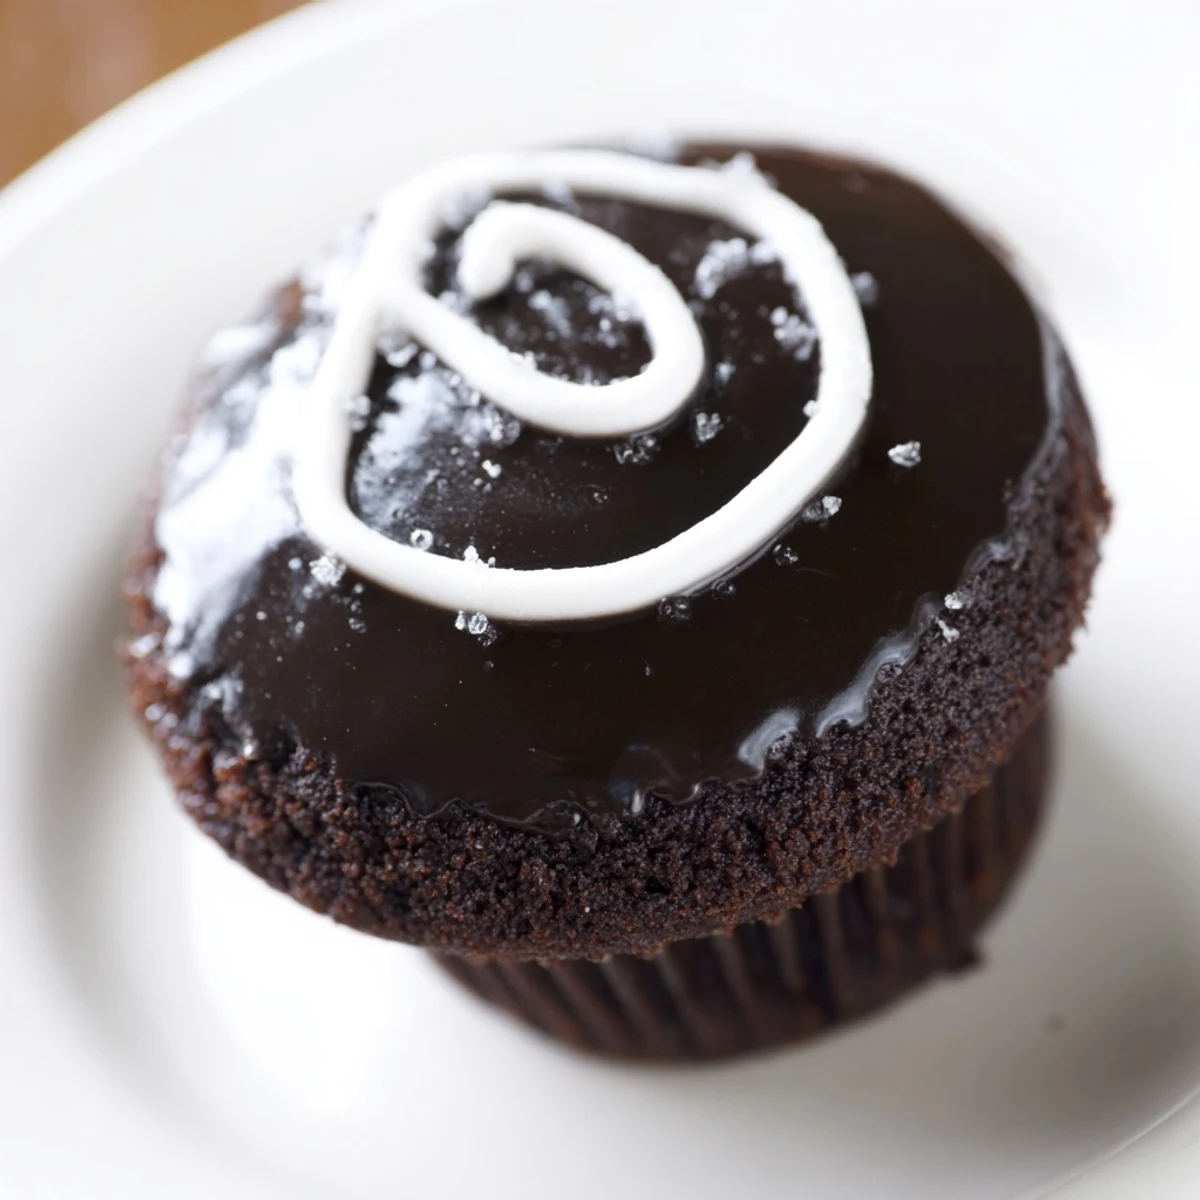
 These homemade Hostess cupcakes bring the beloved childhood treat right to your kitchen. Tender chocolate cupcakes are baked from scratch, then cored and filled with a fluffy marshmallow-cream mixture that's light and sweet.
Each cupcake is dipped in a rich semi-sweet chocolate ganache that sets into a shiny shell, then finished with the classic white icing swirl on top. They're fun to make and even more fun to eat—perfect for birthdays, bake sales, or anytime nostalgia strikes.
The unmistakable crinkle of a Hostess wrapper is buried somewhere deep in my childhood memories, alongside Saturday morning cartoons and grass stained knees. Recreating that experience from scratch felt almost sacrilegious at first, but one bite of the homemade version erased every doubt. The chocolate cake is richer, the filling actually tastes like vanilla instead of sugar coated air, and the ganache sets into a shell that snaps when you bite through it. This is the cupcake that made my nephew declare me the coolest aunt in the world, and honestly I am not arguing.
I brought a tray of these to a neighborhood potluck last summer and watched a grown man eat three in under ten minutes without making eye contact with anyone. His wife later asked me for the recipe, and I pretended the swirl on top required years of training. It does not, but a little mystique never hurt anybody.
Ingredients
- All purpose flour (1 cup, 120g): Provides the structure without making the cake dense, so measure with a light hand.
- Unsweetened cocoa powder (1/2 cup, 45g): Dutch processed gives a deeper flavor and darker color if you want that extra intensity.
- Granulated sugar (1 cup, 200g): Balances the cocoa bitterness and keeps the crumb tender.
- Baking soda and baking powder (1/2 tsp and 1 tsp): This dual leavening combo gives the right lift for a tender cupcake.
- Salt (1/4 tsp): Just enough to sharpen all the sweet flavors.
- Buttermilk (1/2 cup, 120ml, room temperature): Adds tang and keeps the cake moist, so bring it to room temp for even mixing.
- Vegetable oil (1/2 cup, 120ml): Oil keeps these softer than butter would, especially after refrigeration.
- Large eggs (2, room temperature): Bind everything together and add richness.
- Vanilla extract (2 tsp for cake plus 1 tsp for filling): Use the real stuff here because it shines through in both the cake and the marshmallow filling.
- Hot water (1/2 cup, 120ml): Blooms the cocoa powder and thins the batter for a lighter crumb.
- Unsalted butter (1/3 cup, 75g, softened): The butter base for the filling needs to be truly soft or you will fight lumps.
- Powdered sugar (3/4 cup, 90g for filling plus 1/4 cup, 30g for swirl): Sweetens the filling and creates the simple white icing on top.
- Marshmallow creme (1 cup, 220g): This is the secret to that distinctive squishy center.
- Milk (1 to 2 tsp for filling, 1 tsp for swirl): Adjusts consistency in both the filling and the piped swirl.
- Semi sweet chocolate chips (1/2 cup, 85g): Melted into ganache for the glossy topping.
- Heavy cream (1/4 cup, 60ml): Transforms the chocolate chips into a silky, dippable glaze.
Instructions
- Preheat and prepare:
- Set your oven to 350 degrees F and line a 12 cup muffin tin with paper liners so nothing sticks later.
- Whisk the dry team:
- In a large bowl, whisk together the flour, cocoa powder, sugar, baking soda, baking powder, and salt until evenly blended and free of cocoa clumps.
- Bring in the wet ingredients:
- Pour in the buttermilk, oil, eggs, and vanilla, mixing gently until just combined before adding the hot water and stirring until the batter is smooth and surprisingly thin.
- Fill and bake:
- Divide the batter among the liners, filling each about two thirds full, and bake for 18 to 20 minutes until a toothpick slides out clean.
- Cool completely:
- Transfer the cupcakes to a wire rack and let them cool entirely because even slightly warm cakes will melt your filling into a soupy mess.
- Make the marshmallow filling:
- Beat the softened butter until light and creamy, then add powdered sugar for a minute before folding in the marshmallow creme and vanilla until cloudlike and fluffy.
- Core and fill the cupcakes:
- Use a small knife or cupcake corer to carve a shallow well in the center of each cake, then pipe the filling generously into each hole and replace the tops if you saved them.
- Prepare the ganache:
- Heat the heavy cream until steaming but not boiling, pour it over the chocolate chips, wait two minutes, and stir until you have a glossy, velvety mixture.
- Glaze the tops:
- Spoon or dip each cupcake top into the ganache, letting excess drip off, then set them aside until the chocolate firms up into a beautiful shell.
- Pipe the signature swirl:
- Stir powdered sugar with just enough milk to make a thick but pipeable icing, load it into a piping bag or zip top bag with a tiny corner snipped, and draw loops across each cupcake.
 Pin It
 My friend Laura called me on a Tuesday night in a panic because she had promised her daughter a batch of homemade Hostess cupcakes for a school bake sale the next morning. We talked through the recipe step by step over the phone while she frantically coring cupcakes at her kitchen counter at eleven oclock at night, and apparently they sold out in fifteen minutes.
Storage That Actually Works
These cupcakes keep well in the refrigerator for up to three days if you store them in an airtight container, but always let them sit at room temperature for about thirty minutes before serving so the filling softens back up. The ganache firms up in the fridge and can almost feel like a hard candy shell, which some people actually prefer. I have also frozen them individually wrapped for up to a month, though the swirl icing sometimes weeps a little upon thawing.
Tools Worth Having
A cupcake corer is one of those single use gadgets I resisted buying for years, but it saves so much time and creates a perfectly uniform cavity every single time. If you refuse to get one, a small paring knife and a gentle twisting motion works almost as well, just be careful not to puncture through the bottom. Electric mixers make the filling fluffier than you can achieve by hand, and a wire rack prevents soggy bottoms during cooling.
Serving and Pairing Ideas
Cold milk is the obvious companion here, but a strong cup of coffee cuts through the sweetness in a way that makes you feel sophisticated while eating something deeply silly and fun. I have also served these alongside vanilla bean ice cream for dessert parties where people want a little bit of everything on their plate.
- Sprinkle flaky sea salt on the ganache before it sets for a salted chocolate twist.
- Use a star tip on the filling so it leaves a decorative peak when you pull the bag out.
- Always make a couple extra because someone will inevitably eat one before they are fully assembled.
 Pin It
 Some recipes are about nourishment and others are about recapturing a feeling, and these little cupcakes somehow manage to do both. Share them generously and watch the people you love turn briefly into kids again.
Recipe Questions
- → How do I core the cupcakes without breaking them?
-
Use a small paring knife or a cupcake corer tool to gently remove a circular section from the center of each cooled cupcake. Cut at a slight angle about halfway down, being careful not to go through the bottom. A melon baller also works well for this step.
- → Can I make the filling ahead of time?
-
Yes, you can prepare the marshmallow cream filling up to 2 days in advance. Store it covered in the refrigerator, then let it come to room temperature and give it a quick stir before piping into the cupcakes.
- → Why is my cupcake batter so thin?
-
Don't worry—a thin batter is completely normal for this method. The hot water helps bloom the cocoa powder for deeper chocolate flavor and creates a moist, tender crumb. The cupcakes will bake up perfectly light and fluffy.
- → How do I get a smooth ganache topping?
-
Make sure your heavy cream is steaming hot but not boiling when you pour it over the chocolate chips. Let it sit undisturbed for 2 minutes, then stir gently from the center outward until smooth and glossy. If needed, warm it in 10-second intervals in the microwave.
- → What's the best way to pipe the white swirl?
-
Use a piping bag fitted with a fine round tip or a zip-top bag with a tiny corner snipped off. Practice the signature curly-Q motion on a plate first. Pipe in one continuous squiggly line across the top of each cupcake for that classic Hostess look.
- → Can I use Dutch-processed cocoa powder instead of natural?
-
Absolutely. Dutch-processed cocoa will give you a deeper, richer chocolate flavor and a darker color. Since the batter uses both baking soda and baking powder, it will still rise properly with either type of cocoa.
